Consider buying an RV backup camera system with side view camera option? This article might help you decide. Side view cameras on RVs are a vital safety feature that removes blind spots when driving.
You would get a little nervous when changing lanes because you can’t see what’s going on around you.
That’s why in this article we’re going to discuss about choosing a side view camera for RV and camera placement, etc.
The side RV camera gives you a better view of both sides of your RV and makes driving it much easier.
Fortunately, the process of adding a camera to the side of your RV is not too different from adding a backup camera. However, there are a couple of key differences, and we’ll show you how to install a side-view RV camera in this post.
Let’s get started.
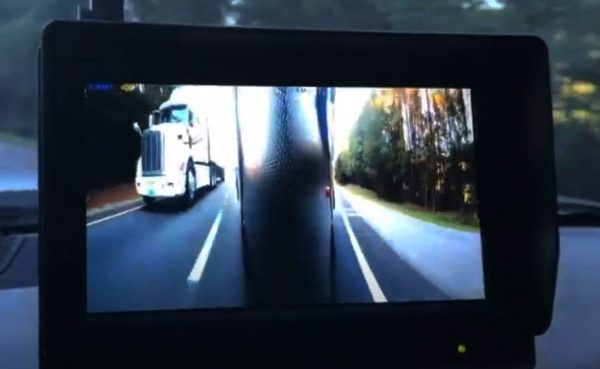
Help with lanes changing – Changing lanes from left to right with a vehicle in the right lane behind the RV is somewhat iffy. But real time video feed from a side view camera would be a big help with lanes changing situations.

Offers wide field of view – If a camera has an angle of view of 90 degrees, it means that the driver has a view angle of 45 degrees on either side of the camera which is on the vehicle’s center line. Therefore, having a larger field, or angle of view, means there is a larger area visible behind the RV.
Night vision function – What might be an issue with the traditional side/rear view mirrors is the size and design. There’s no anti-reflective coat that would reduce the glare during night time driving, so using a mirror for night rides might be difficult. But with the help of infrared LEDs inside the side camera ON, you can still see everything clearly at night time on your screen.
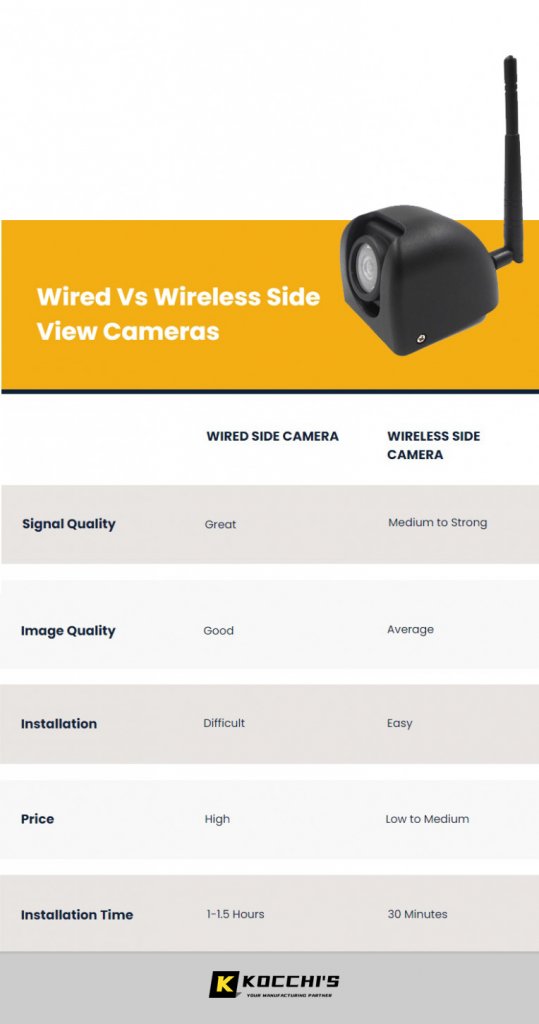
Wired Or Wireless Side RV Cameras?
Wired RV Cameras – A more stable and accurate signal is given by RV side cameras that are wired. They also create high-resolution images and have excellent night vision. You must, however, decide if your RV is capable of supporting wired installations. The installation process can be difficult if this is not done correctly. The drawback is that wired cameras for RVs are more costly than wireless camera.
Related Reading: Wired, Wireless Or Portable Backup Cameras? Which is Right For You?
So how much does it cost to install a wired backup RV camera? Due to the installation and time involved, a wired RV backup camera system would cost more than a wireless RV camera system. (There is the additional expense if you hire someone to mount the wired RV camera system for you.)
How much more it would cost depends on the scale of the rig and the number of cameras being mounted.
Typically, installation costs between $75 and $100 per hour.
Installing a single camera in a car, truck, or simple RV should take no more than two hours. It would take approximately three hours to mount a semi, big utility truck, or a more complicated RV. Allow approximately 30 to 45 minutes for each additional camera’s installation.
Your installation can cost more or less depending on its size and complexity.
Wireless RV Cameras – Wireless cameras, as the name implies, do not require running cables. The lack of wires to connect the camera with the monitor directly, on the other hand, can result in image interference and occasional signal issues. However, the lack of wires makes the installation process fast and painless. You just need to plug the side cameras into a 12V DC power source to get started.
RV Side Camera Placement: Where to Place(DIY)?
It’s just as important to know where you can place your side cameras as it is to know how to install them there. You won’t be able to see the sides of the RV properly if you don’t position them in the right positions.
As a result, an RV’s side camera should be mounted just below the clearance lights. You shouldn’t have too much trouble if your clearance lights are low, but this will vary from rig to rig. You can mount the side view cameras almost at the roof line just behind the entry door as another installation option. Turn it into your RV entrance door security camera when you’re parked at a campsite.
Tool Required to Install RV Side Cameras
Here are the tools you will need for the installation of the RV side camera:
-
A drill with a 3/4 bit
-
A screwdriver set
-
Some good RV sealant
These tools will help you achieve a flawless weatherproof seal as well as tighten the screws that came with your camera.
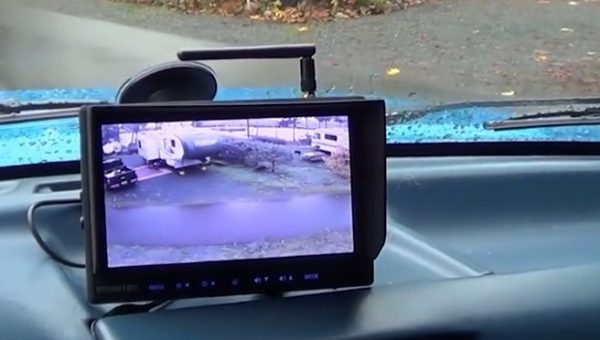
Install the Monitor
The wired/wireless monitor is placed on the inside of the RV. Try not to mount it in the direct line of sight. It will make it harder for you to be noticed. Instead, clip it to your dashboard or install it lower and to the left.
To connect the monitor’s cable to the power source, you may need to drill another hole within the RV.
Install the Side Cameras
Step 1: Mount the camera
On the side of your RV, the cameras should be centered as low as possible. So before screwing it in place, make sure you find the ideal spot.
Step2: Adjust the camera’s orientation
This move is made easier if you have two people on hand: one inside watching the dash monitor and the other outside advising the installer on which way to turn the camera so that the view is straight down the side of your RV.
Power up the Camera
For Wired Side Cameras:
To receive power and transmit data, your side camera will need a wired connection with the monitor. You have to run the cable all the way to the front of your vehicle by drilling a 34-inch hole and feeding the wires through it.
However, since you’ll be using the side camera to display when you’re making a turn, you do not want to keep it powered all of the time. Instead, consider attaching the camera cable to your turn lights or side marker lights, which activates your turn lights and your side camera at the same time when you are turning right or left.
For Wireless Side Cameras:
Good news is that you don’t have to run the cable all the way to the front of your vehicle to connect with your monitor for video feed. But you still need to feed the side cameras with power through the closest power source. Just like the installation for wired side cameras, consider attaching the camera cable to your turn lights or side marker lights, which activates your turn lights and your side camera at the same time when you are turning right or left.
Screen Size Matters!
No matter it is a wired or wireless camera system, you can choose backup camera monitors with different screen sizes, from 4.3″, 5″ to 7″, and even a 9″ monitor. If you’re going to add an additional 3 cameras so that you can see behind you, on either side and then use the 4th camera wherever you see fit, make sure you start with 7″ monitor option at least, if images from 3 cameras come up the same time on your screen, a 4.3″ or 5″ monitor would be too small to show you all these images clearly. It is much easier for you to see from a larger monitor especially while you’re driving.
How about bigger monitor size? You may believe that the maxim ‘the larger the better’ applies here. Let us avoid being insane.
You will undoubtedly obtain a monitor that is so large that it begins to obstruct your view of the lane!
Having said that, monitors usually vary in size from approximately 3 to 9 inches.
Field of View(FOV) is Important
The field of view is the area visible through the side view camera lens surround the RV or travel trailer. Of course, the side mirrors can be used to see some of this area. However, the vehicle’s blind zone, or called blind spot, is not visible in mirrors, and you should try to cover as much of it as possible with a side camera.
A single side view camera should be placed as close to the vehicle’s center line as possible. What counts is that the lens will cover the whole field of view, both to the left and right of the center.
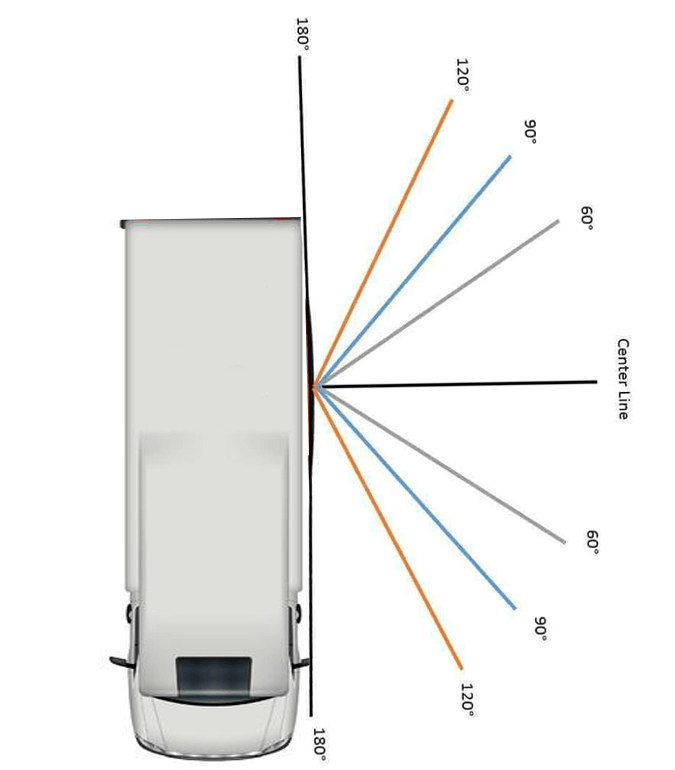
Angle of View RV Side
90-Degree View Angle: This is the smallest view angle that should be considered when purchasing an RV backup camera. These cameras capture images at a 45-degree angle from the centerline. This provides a fair view of the side, allowing you to see oncoming cars and pedestrians.
These cameras will effectively eliminate the majority of your blind spots. However, it can only partially conceal your blind spots. This forces you to continuously scan the area between your camera and mirrors for someone entering your blind spot.
130-Degree View Angle: This is what we highly recommended! These cameras usually provide the best trade-off between depth of field and view clarity. From either side of the vehicle’s centerline, you’ll have approximately 65 degrees of coverage. This enables you to see someone who might be inside your blind spot.
Additionally, you should track their approach to ensure that they do not materialize out of nowhere on the camera’s field of view.
The only drawback here in comparison to a camera with a smaller field of view? A larger screen like 7″-9″ is needed to show the images clearly in this view.
Conclusion
A side RV camera offers so much safety, if you don’t have one, the couple hundred dollar investment would be worth your while in our opinion.
Was there something we forgot to mention? Please let us know so that we can cover that part as well.
Having a high quality RV backup camera and side camera is the best way to keep an eye on your surrounding while repositioning or moving. Consider making your first upgrade a backup / side camera, and get some peace of mind.
If you’re not sure what to choose, contact us and tell us more about your needs, we’ll be happy to respond with some advice for your situation.


Leave A Comment